Installing The CPU Unit and I/O Unit OMRON PLC Step by Step
Installing The CPU Unit and I/O Unit OMRON PLC Step by Step
Installing PLC Step by step using OMRON PLC as sample:1. Panel Installation
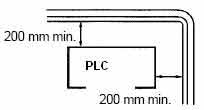
Power lines & high-voltage equipment can cause electrical noise in the PLC; • Do not install the PLC in a panel or cabinet with high-voltage equipment • Allow at least 200 mm between the PLC and nearby power lines See the picture below;
2. Installing the CPU Unit and I/O Unit
Do not install the small PLC in either of the following positions.
The small PLC can be installed on a horizontal surface or on a DIN track. See the picture below;
Lower the small PLC so that the notch on the back of the PLC catches the top of the DIN Track. Push the PC forward until the lock snaps into place. See the picture below;
For the big PLC before installing, the Units have to compiled one by one. There is no single Unit that can be said to constitute a Rack PLC. To build a Rack PLC, we start with a Backplane. The Backplane for the Omron PLC is shown below.
The Backplane is a simple device having two functions. The first is to provide physical support for the Units to be mounted to it. The second is to provide the connectors and electrical pathways necessary for connecting the Units mounted to it. The core of the PLC is the CPU. The CPU contains the program consisting of the series of steps necessary for the control task. The CPU has a built-in power supply, and fits into the rightmost position of the Backplane.
The CPU of the big PLC has no I/O points built in. So, in order to complete the PLC we need to mount one or more I/O Units to the Backplane. Mount the I/O Unit to the Backplane by locking the top of the I/O Unit into the slot on the Backplane and rotating the I/O Unit downwards as shown in the following diagram. Press down on the yellow tab at the bottom of the slot, press the I/O Unit firmly into position, and then release the yellow tab.
The figure below shows one I/O Unit mounted directly to the left of the CPU.
I/O Units are where the control connections are made from the PLC to all the various input devices and output devices. As you can see from the figure above, there is still some space available on the left side of the Backplane. This space is for any additional I/O Units that may be required.The figure below shows a total of eight I/O Units mounted to the Backplane.
After the big PLC compiled in the backplane then the big PLC can be installed on the DIN Rail. The DIN Rail Mounting Bracket shown below is necessary for mounting the PLC to the DIN Rail.
The following diagram is a view of the back of the Backplane. Attach one Mounting Bracket to the left and right sides of the Backplane as shown below.
Mount the Backplane to the DIN Rail so that the claws on the Mounting Brackets fit into the upper portion of the DIN Rail as shown below.
Loosen the screws attaching the Mounting Brackets to the Backplane. Slide the Backplane upward as shown below so that the Mounting Bracket and Backplane clamp securely onto the DIN Rail. Tighten the screws.
3. Installing the Expansion Unit or Expansion I/O Unit
The Expansion Unit or Expansion I/O Unit are usually attached when amount of I/O devices to be controlled increase its amount over than capacities of the existing I/O Unit or attached when needed to a special need like temperature sensor. The following shown the example of Expansion Units.
Expansion Unit of the small PLC
Expansion Unit of the big PLC
For the small PLC use the following procedure when connecting an Expansion Unit or Expansion I/O Unit;Remove the cover from the CPU Unit’s or the Expansion I/O Unit’s expansion connector. Use a flat-blade screwdriver to remove the cover from the Expansion I/O Connector.
Insert the Expansion I/O Unit’s connecting cable into the CPU Unit’s or the Expansion I/O Unit’s expansion connector.
Replace the cover on the CPU Unit’s or the Expansion I/O Unit’s expansion connector.
For the big PLC use the following picture when connecting an Expansion Unit or Expansion I/O Unit;
4. Installing I/O devices
I/O devices are attached at the place have been determined in the work plan and wiring diagram. For switches are usually attached at the panel while the sensor, selenoid and motor is usually placed at the machine to be controlled.
5. Wiring and connections
Duct Work
I/O connections
Consider PLC operation, maintenance, and surrounding conditions when installing the PLC in a panel or cabinet. The operating temperature range for the PLC is 0°C to 55°C Be sure that there is adequate ventilation for cooling;
• Allow enough space for air circulation.
• Do not install the PLC above equipment that generates a large amount of heat, such as heaters, transformers, or large resistors.
• Install a cooling fan or system when the ambient temperature exceeds 55°C
• Do not install the PLC above equipment that generates a large amount of heat, such as heaters, transformers, or large resistors.
• Install a cooling fan or system when the ambient temperature exceeds 55°C

The small PLC in panel
Power lines & high-voltage equipment can cause electrical noise in the PLC; • Do not install the PLC in a panel or cabinet with high-voltage equipment • Allow at least 200 mm between the PLC and nearby power lines See the picture below;

Make sure that the PLC can be accessed for normal operation and maintenance;
• Provide a clear path to the PLC for operation and maintenance. High-voltage equipment or power lines could be dangerous if they are in the way during routine operations
• The PLC will be easiest to access if the panel or cabinet is installed about 3 to 5 feet above the floor
• Provide a clear path to the PLC for operation and maintenance. High-voltage equipment or power lines could be dangerous if they are in the way during routine operations
• The PLC will be easiest to access if the panel or cabinet is installed about 3 to 5 feet above the floor
2. Installing the CPU Unit and I/O Unit
The small PLC must be installed in the position shown below to ensure adequate cooling.
See the picture below;
See the picture below;
Do not install the small PLC in either of the following positions.
The small PLC can be installed on a horizontal surface or on a DIN track. See the picture below;
Lower the small PLC so that the notch on the back of the PLC catches the top of the DIN Track. Push the PC forward until the lock snaps into place. See the picture below;
For the big PLC before installing, the Units have to compiled one by one. There is no single Unit that can be said to constitute a Rack PLC. To build a Rack PLC, we start with a Backplane. The Backplane for the Omron PLC is shown below.
The Backplane is a simple device having two functions. The first is to provide physical support for the Units to be mounted to it. The second is to provide the connectors and electrical pathways necessary for connecting the Units mounted to it. The core of the PLC is the CPU. The CPU contains the program consisting of the series of steps necessary for the control task. The CPU has a built-in power supply, and fits into the rightmost position of the Backplane.
The CPU of the big PLC has no I/O points built in. So, in order to complete the PLC we need to mount one or more I/O Units to the Backplane. Mount the I/O Unit to the Backplane by locking the top of the I/O Unit into the slot on the Backplane and rotating the I/O Unit downwards as shown in the following diagram. Press down on the yellow tab at the bottom of the slot, press the I/O Unit firmly into position, and then release the yellow tab.
The figure below shows one I/O Unit mounted directly to the left of the CPU.
I/O Units are where the control connections are made from the PLC to all the various input devices and output devices. As you can see from the figure above, there is still some space available on the left side of the Backplane. This space is for any additional I/O Units that may be required.The figure below shows a total of eight I/O Units mounted to the Backplane.
After the big PLC compiled in the backplane then the big PLC can be installed on the DIN Rail. The DIN Rail Mounting Bracket shown below is necessary for mounting the PLC to the DIN Rail.
The following diagram is a view of the back of the Backplane. Attach one Mounting Bracket to the left and right sides of the Backplane as shown below.
Mount the Backplane to the DIN Rail so that the claws on the Mounting Brackets fit into the upper portion of the DIN Rail as shown below.
Loosen the screws attaching the Mounting Brackets to the Backplane. Slide the Backplane upward as shown below so that the Mounting Bracket and Backplane clamp securely onto the DIN Rail. Tighten the screws.
3. Installing the Expansion Unit or Expansion I/O Unit
The Expansion Unit or Expansion I/O Unit are usually attached when amount of I/O devices to be controlled increase its amount over than capacities of the existing I/O Unit or attached when needed to a special need like temperature sensor. The following shown the example of Expansion Units.
Expansion Unit of the small PLC
Expansion Unit of the big PLC
For the small PLC use the following procedure when connecting an Expansion Unit or Expansion I/O Unit;Remove the cover from the CPU Unit’s or the Expansion I/O Unit’s expansion connector. Use a flat-blade screwdriver to remove the cover from the Expansion I/O Connector.
Insert the Expansion I/O Unit’s connecting cable into the CPU Unit’s or the Expansion I/O Unit’s expansion connector.
Replace the cover on the CPU Unit’s or the Expansion I/O Unit’s expansion connector.
For the big PLC use the following picture when connecting an Expansion Unit or Expansion I/O Unit;
4. Installing I/O devices
I/O devices are attached at the place have been determined in the work plan and wiring diagram. For switches are usually attached at the panel while the sensor, selenoid and motor is usually placed at the machine to be controlled.
5. Wiring and connections
Duct Work
Hanging Ducts If power cables carrying more than 10 A 400 V, or 20 A 220 V must be run alongside the I/O wiring (that is, in parallel with it), at least 300 mm must be left between the power cables and the I/O wiring as shown below.
Floor Ducts If the I/O wiring and power cables must be placed in the same duct (for example, where they are connected to the equipment), they must be shielded from each other using grounded metal plates.
Conduits if Separating the PLC I/O lines, power and control lines, and power cables, as shown in the following diagram.
Conduits if Separating the PLC I/O lines, power and control lines, and power cables, as shown in the following diagram.
I/O connections
Connect the I/O Devices to the I/O Units. Use 1.25-mm2 cables or larger The terminals have screws with 3.5-mm diameter heads and self-raising pressure plates. Connect the lead wires to the terminals as shown below. Tighten the screws with a torque of 0.8 N _ m.
If you wish to attach solderless type terminals to the ends of the lead wires, use terminals having the dimensions shown below.
The following diagrams show the input configurations. This input configuration depend on specification of the Input Unit will be used. See the specification before install.
The following diagrams show the input configurations. This output configuration depend on specification of the Output Unit will be used. See the specification before install.